从零搭建Linux虚拟机环境
基础
镜像安装
CentOS7-1908版本
http://vault.centos.org/7.7.1908/isos/x86_64/CentOS-7-x86_64-DVD-1908.torrent
基础命令包安装
ifconfig
yum search ifconfigyum install net-tools.x86_64
lsb_release
yum install -y redhat-lsb
yum提示没有可用镜像
curl -o /etc/yum.repos.d/CentOS-Base.repo http://mirrors.aliyun.com/repo/Centos-7.repo
wget
yum install wget
dns
- 虚拟机ping不通域名的解决办法
vi /etc/sysconfig/network-scripts/ifcfg-ens33 - 虚拟机的静态ip和真机的必须在同一网段,添加谷歌的dns解析
- 虚拟机内的配置
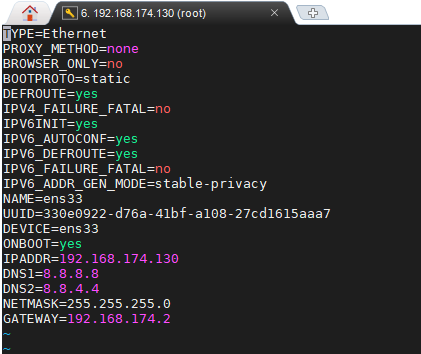
真机的ip信息

- 虚拟机ping不通域名的解决办法
环境搭建
JDK1.8
oracle官网下载jdk后上传虚拟机
解压并配置环境变量,比如我下载的是jre1.8.0_202
vi /etc/profile/bashJAVA_HOME=/usr/local/java/jre1.8.0_202 PATH=$JAVA_HOME/bin:$PATH CLASSPATH=.:$JAVA_HOME/lib/dt.jar:$JAVA_HOME/lib/tools.jar:$JAVA_HOME/jre/lib/rt.jar export JAVA_HOME export CLASSPATH export PATHsource /etc/profile或重启虚拟机使环境变量生效
python3
- 见另一篇博客 centos7安装python环境
mysql 5.7
下载并安装mysql官方的yum repository:
wget https://dev.mysql.com/get/Downloads/MySQL-5.7/mysql-5.7.41-1.el7.x86_64.rpm-bundle.tar解压包:
tar -xvf mysql-5.7.41-1.el7.x86_64.rpm-bundle.taryum -y install mysql-community-common-5.7.41-1.el7.x86_64.rpm mysql-community-libs-5.7.41-1.el7.x86_64.rpm mysql-community-client-5.7.41-1.el7.x86_64.rpm mysql-community-server-5.7.41-1.el7.x86_64.rpm启动
systemctl enable mysqld && systemctl start mysqld临时密码
grep 'temporary password' /var/log/mysqld.log根据临时密码登入mysql
改密码
ALTER USER 'root'@'localhost' IDENTIFIED BY 'new pwd';更改密码弱口令设置,设置简单密码:
set global validate_password_policy=0;set global validate_password_length=1;
配置远程登陆
grant all on *.* to 'root'@'%' identified by 'pwd';立即生效:
flush privileges;
创建用户&授权
sql-- 创建用户 CREATE USER '用户名'@'localhost' IDENTIFIED BY '密码'; CREATE USER '用户名'@'%' IDENTIFIED BY '密码'; -- 授权全部 grant all privileges on 数据库名称.* to '用户名'@'localhost' identified by '密码'; #本地授权 grant all privileges on 数据库名称.* to '用户名'@'%' identified by '密码'; #远程授权 flush privileges; #刷新系统权限表 -- 授权指定 grant select,update,delete,insert on 数据库名称.* to '用户'@'localhost' identified by '密码'; flush privileges; #刷新系统权限表 -- 删除用户 Delete FROM mysql.user Where User='用户名' and Host='localhost'; #删除本地用户 Delete FROM mysql.user Where User='用户名' and Host='%'; #删除远程用户 flush privileges; #刷新系统权限表 -- 删除用户及权限 DROP USER 'username'@'localhost'; DROP USER 'username'@'%'; -- 查看当前用户权限 show grants; -- 查看指定用户权限 show grants for username@localhost;
mysql 8.0
sql-- 修改root密码 UPDATE mysql.user SET authentication_string=null WHERE User='root'; FLUSH PRIVILEGES; ALTER USER 'root'@'localhost' IDENTIFIED WITH mysql_native_password BY 'new_password'; FLUSH PRIVILEGES; CREATE USER ''@'' IDENTIFIED BY ''; GRANT ALL PRIVILEGES ON *.* TO ''@'';nginx
依赖
- centos:
yum -y install gcc pcre pcre-devel zlib zlib-devel openssl openssl-devel - ubuntu:
apt install libpcre3 libpcre3-dev openssl libssl-dev
- centos:
下载安装包
wget http://nginx.org/download/nginx-1.9.9.tar.gz解压到指定目录
tar -xzvf nginx-1.9.9.tar.gz -C /usr/local/nginx/切换到nginx的目录执行 cd /usr/local/nginx/nginx-1.9.9
bash./configure --prefix=/usr/local/nginx --with-http_stub_status_module --with-http_ssl_module #配置ssl模块 make make install安装后切换到/usr/local/nginx/sbin启动nginx并访问
开机自启nginx
vi /etc/init.d/nginxbash#!/bin/bash # # nginx - this script starts and stops the nginx daemon # # chkconfig: - 85 15 # description: NGINX is an HTTP(S) server, HTTP(S) reverse \ # proxy and IMAP/POP3 proxy server # processname: nginx # config: /etc/nginx/nginx.conf # config: /etc/sysconfig/nginx # pidfile: /var/run/nginx.pid # Source function library. . /etc/rc.d/init.d/functions # Source networking configuration. . /etc/sysconfig/network # Check that networking is up. [ "$NETWORKING" = "no" ] && exit 0 nginx="/usr/local/nginx/sbin/nginx" prog=$(basename $nginx) NGINX_CONF_FILE="/usr/local/nginx/conf/nginx.conf" [ -f /etc/sysconfig/nginx ] && . /etc/sysconfig/nginx lockfile=/var/lock/subsys/nginx make_dirs() { # make required directories user=`$nginx -V 2>&1 | grep "configure arguments:.*--user=" | sed 's/[^*]*--user=\([^ ]*\).*/\1/g' -` if [ -n "$user" ]; then if [ -z "`grep $user /etc/passwd`" ]; then useradd -M -s /bin/nologin $user fi options=`$nginx -V 2>&1 | grep 'configure arguments:'` for opt in $options; do if [ `echo $opt | grep '.*-temp-path'` ]; then value=`echo $opt | cut -d "=" -f 2` if [ ! -d "$value" ]; then # echo "creating" $value mkdir -p $value && chown -R $user $value fi fi done fi } start() { [ -x $nginx ] || exit 5 [ -f $NGINX_CONF_FILE ] || exit 6 make_dirs echo -n $"Starting $prog: " daemon $nginx -c $NGINX_CONF_FILE retval=$? echo [ $retval -eq 0 ] && touch $lockfile return $retval } stop() { echo -n $"Stopping $prog: " killproc $prog -QUIT retval=$? echo [ $retval -eq 0 ] && rm -f $lockfile return $retval } restart() { configtest || return $? stop sleep 1 start } reload() { configtest || return $? echo -n $"Reloading $prog: " killproc $nginx -HUP RETVAL=$? echo } force_reload() { restart } configtest() { $nginx -t -c $NGINX_CONF_FILE } rh_status() { status $prog } rh_status_q() { rh_status >/dev/null 2>&1 } case "$1" in start) rh_status_q && exit 0 $1 ;; stop) rh_status_q || exit 0 $1 ;; restart|configtest) $1 ;; reload) rh_status_q || exit 7 $1 ;; force-reload) force_reload ;; status) rh_status ;; condrestart|try-restart) rh_status_q || exit 0 ;; *) echo $"Usage: $0 {start|stop|status|restart|reload|configtest}" exit 2 esac- bash
chmod 777 /etc/init.d/nginx - bash
chkconfig nginx on
开放端口
- 查看已经开放的端口
firewall-cmd --list-ports - 开启端口
firewall-cmd --zone=public --add-port=80/tcp --permanent- zone:作用域
- -add-port=80/tcp 端口/协议
- --permanent 永久生效,没有此参数后重启失效
firewall-cmd --reload #重启firewallsystemctl stop firewalld.service #停止firewallsystemctl disable firewalld.service #禁止firewall开机启动firewall-cmd --state #查看默认防火墙状态
- 查看已经开放的端口
redis
下载安装包
wget http://download.redis.io/releases/redis-5.0.7.tar.gztar -zxvf redis-5.0.7.tar.gzmv /root/redis-5.0.7 /usr/local/rediscd /usr/local/redis/redis-5.0.7make && make PREFIX=/usr/local/redis install可能会报错,因为centos自带的gcc版本太低
执行命令
bashyum -y install centos-release-scl devtoolset-9-gcc devtoolset-9-gcc-c++ devtoolset-9-binutils # scl enable devtoolset-9 bash #临时启用新版本的gcc echo "source /opt/rh/devtoolset-9/enable" >>/etc/profile # 永久启用新版gcc
开机自启redis
- bash
vi /etc/init.d/redis - bash
#!/bin/sh # chkconfig: 2345 10 90 # description: Start and Stop redis REDISPORT=6379 EXEC=/usr/local/redis/bin/redis-server CLIEXEC=/usr/local/redis/bin/redis-cli PIDFILE=/var/run/redis_${REDISPORT}.pid CONF="/usr/local/redis/redis.conf" case "$1" in start) if [ -f $PIDFILE ] then echo "$PIDFILE exists, process is already running or crashed" else echo "Starting Redis server..." $EXEC $CONF & fi ;; stop) if [ ! -f $PIDFILE ] then echo "$PIDFILE does not exist, process is not running" else PID=$(cat $PIDFILE) echo "Stopping ..." $CLIEXEC -p $REDISPORT shutdown while [ -x /proc/${PID} ] do echo "Waiting for Redis to shutdown ..." sleep 1 done echo "Redis stopped" fi ;; restart) "$0" stop sleep 3 "$0" start ;; *) echo "Please use start or stop or restart as first argument" ;; esac - bash
vim /usr/local/redis/redis.conf 修改 bind 0.0.0.0 #所有ipv4端口 protected-mode no # 关闭保护模式 daemonize yes # 守护进程 requirepass password #需要密码登录 pidfile /var/run/redis_6379.pid #pid文件 - bash
# 授权 chmod 777 /etc/init.d/redis - bash
# 开机启动 chkconfig redis on - bash
# 创建客户端软链接
ln -s /usr/local/redis/bin/redis-cli /usr/local/bin/redis-cli
docker
卸载旧版本
bashsudo yum remove docker \ docker-client \ docker-client-latest \ docker-common \ docker-latest \ docker-latest-logrotate \ docker-logrotate \ docker-engine使用docker repository安装
bash# set up repository sudo yum install -y yum-utils sudo yum-config-manager \ --add-repo \ https://download.docker.com/linux/centos/docker-ce.repo # install docker engine sudo yum install docker-ce docker-ce-cli containerd.io # start docker engine sudo systemctl start docker